
Waypoint console commands Summary
The following Waypoint commands are available (note these ARE case sensitive):
"waypoint on" - Turns on displaying of waypoints.
"waypoint on noclip" - Turns on waypoint editing with noclip cheat. This allows you to fly and you don't collide with walls. Useful for doing swim waypoints.
"waypoint off" - Turns off displaying of all waypoints.
"waypoint add" - Adds a waypoint at the current player location. A Menu will pop up where you have to select the different types of waypoints
"waypoint delete" - Deletes the waypoint nearest to the player (see below).
"waypoint find x" - Shows you the Direction to a specific Waypoint Nr. x
"waypoint showflags" - Shows all of the Flags which are set manually on this waypoint
"waypoint addflag" - Allows you to manually add Flags to a waypoint.
"waypoint delflag" - Let's you select a waypoint flag to delete
"waypoint setradius x" - Manually sets the Wayzone Radius for this waypoint to Value x
"waypoint stats" - Shows the number of different waypoints you did already set.
"waypoint check" - Checks if all Waypoints are valid (automatically done when saving them too)
"wayzone calcall" - Calculates the Wayzone Radius for all Waypoints in the Map. (obsolete now since V1.3 because wayzones are automatically set when a waypoint is created)
"waypoint save" - Saves the current waypoint list to a file (with Waypoint & Path Checking)
"waypoint save nocheck" - Same as above but forcing tosave even if they are full of errors...
"waypoint load" - Loads the waypoint list from a waypoint file (and initialises all Datas).
"autowaypoint" - Displays the status of the autowaypoint setting.
"autowaypoint on" - Turns on autowaypoint setting.
"autowaypoint off" - Turns off autowaypoint setting.
"pathwaypoint" - Displays the status of the pathwaypoint setting.
"pathwaypoint on" - Turns on the pathwaypoint setting (see below).
"pathwaypoint off" - Turns off the pathwaypoint setting.
"pathwaypoint add x" - Connects the nearest Waypoint to you, with the waypoint whose number specified with Value x.
"pathwaypoint delete x" - Disconnects the nearest Waypoint to you, with the waypoint whose number specified with Value x.
"debuggoal x" - Forces Bots to use Waypoint Nr. x as a Destination Waypoint
To use the waypoint commands, you will have to use the console. You must start the game with the console option enabled (use "hl.exe -console" in the Target: line of a shortcut or use "Half-Life Console" in your SIERRA menu from the Windows Start button). Use the '~' key to bring down the console. Enter the console commands that you wish, then use the '~' key again to return to the game.
You can make things easier by binding console commands to keys on the keyboard. Just type "bind" followed by the key you want to bind to, followed by the console command. You will have to use double quotes on the console command if it's more than one word. Here's an example of console commands that I use when editing waypoints...
bind a "waypoint add"
bind d "waypoint delete"
bind l "waypoint load"
bind w "waypoint save"
The 'a' key will manually add a waypoint. The 'd' key will delete a waypoint. The 'l' key will load the most recently saved waypoint file (useful if you have added some waypoints but don't want to save them and want to go back to the previously save waypoint list, sort of like an "undo"). The 'w' key (for "write waypoints") will save the list of waypoints to the waypoint file. I tried using 's' (for "save waypoints"), but I kept hitting 's' by mistake when I wanted to add or delete a waypoint.
Using "waypoint add" will place a waypoint at the location that the player is currently at in a map. Waypoints can be placed anywhere the player can go. When placing a waypoint, you will hear a sound to indicate that the waypoint has been dropped (the sound is the same sound the crossbow bolt makes when striking an wall). You then have to specify the Type of waypoint you want to place here.
"Normal Waypoint" sets a Waypoint which is used for normal walking from one point to each other. From V1.4 on you should place lots of them (but still caring for some distance between them), since the Bots use them for hiding and varying their paths. Color is green.
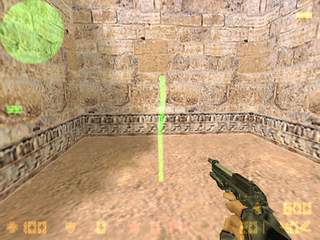
A Standard Normal Waypoint
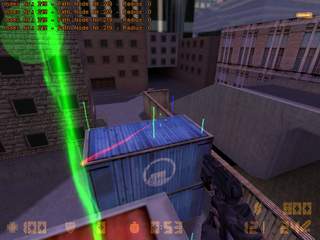
"Terrorist Important Waypoint" and "Counter Important Waypoint" These are strategical waypoints for that team. Bots use these waypoints to patrol the map. How they use this, heavily depends on the map type. In a DE Map you should place a lot of Counter Waypoints around the Bomb Plant Zone and only 2 or 3 strategical waypoints for Terrorists. On a DE Map Counter Bots will most of the time pick a Counter Waypoint as a destination and only sometimes pick a Terrorist waypoint. Terrorists are allowed to pick any of them as a goal waypoint. This behaviour changes with the maptype, in a CS map for example it is vice versa. It helps to think of the important waypoints like strategical positions in a sports game. Imagine the team which defends the Map Goal is the 'Home Team' and the other one is the 'Away Team'. Now you need to have more important waypoints for the Home Team, because the Away Team will go for them anyway. On a DE Map the CT Team is the Home Team, on a CS & AS Map the Terrorist Team is the Home Team. The average number of 'Home Team' Important Waypoints should be about twice as much as the the important waypoints for the 'Away Team'. Terrorists WP Color is red, Counter Waypoints are blue.
|
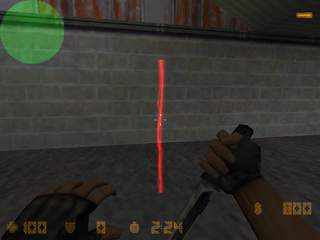
A Terrorist Important Waypoint
|

A Counter-Terrorist Important Waypoint
|
"Ladder Waypoint"
These need to be placed on a ladder if you want the Bots to climb it. Set the bottom waypoint at a position where you're already "stuck" to the ladder. At the top of the ladder you should place another ladder waypoint. Set this at a position where you can hardly look ever the edge. If the ladder is quite a long one, you might want to place another ladder waypoint in between the other ones. In most cases you need to connect the waypoints manually by using pathwaypoint (see below). If there is no connection between the waypoints the Bots won't climb the ladder ! Color is purple.
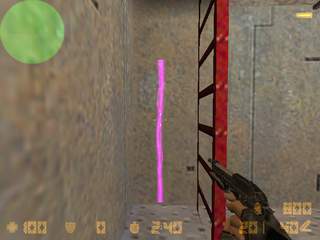
A ladder waypoint
"Rescue Waypoint"
This is only needed on Hostage Maps. It's the location where you want the CT Bots to rescue the hostages. Usually only 1 is needed (depending on how much Rescue Zones there are it might be more). Color is white.
A Rescue Waypoint
"Goal Waypoint"
Place this at a position where Goals of the Map need to be achieved. In DE maps this is a bomb plant spot and on cs maps Counter look here to rescue some hostages. In AS maps these are the Escape points for the VIP. Color is purple like ladder waypoints.

A Goal Waypoint
"Campstart Waypoint"
This is a camping (or sniper if you prefer) waypoint. To place it, look into the direction you want the Bot to start looking at when camping. To let him crouch at that position just press the duck button while adding it. You also need to specify the: "Campend Waypoint" Selecting this will set the end direction for the Bot to look at when camping. Look straight into the direction where you want the Bot to look and select it. Note: you can't set a campend waypoint before doing a campstart waypoint. Normal Color is cyan, if you made it team specific it will have a touch of red if Terrorist WPT or blue if CT.

A Camp Waypoint where the Bot will duck while camping
"Jump Waypoint"
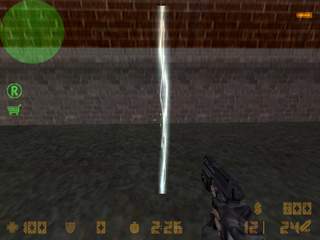
This is the very first of the upcoming learning Features in POD (I'm planning on extending this a lot). By selecting it, your moves will be monitored and if you jump, a normal waypoint will be placed at the position you started to jump and another will be placed where you landed. The Waypoint Type as said before is a standard waypoint but a red connection line will show you that there is a jump connection between the two. You can also create jump connections between already existing waypoints, just make sure you're in the near of the first when jumping and land in the near of the destination waypoint. Note that this will adjust the waypoints origin on the average position of the previous position and your jump position. You can even have the Bots jump to a ladder or do several jumps after each other !
Waypoints connected with a Jump Connection
*NOTE*
To set a crouch waypoint, just keep holding your duck key. You certainly noticed, I don't have different paths for different teams. I removed team specific paths, since the Bots should be free (IMHO) to walk everywhere and I secretly hated to to do waypoints for every team.
Using "waypoint delete" will remove the waypoint closest to the player. The waypoint MUST be within 40 units from the player (about 1/2 the player height) in order to be removed. You will need to stand fairly close to the waypoint to be able to remove it. This prevents you from accidentally removing a waypoint on the other side of the room. When removing a waypoint you will hear a sound indicating that the waypoint was removed (the same sound the tripmine makes when placed on a wall).
"waypoint addflag/deleteflag" gives you some additional options for waypoints. The first, "blockwithhostage" is rarely used. If you set this flag on a waypoint Bots won't take this waypoint if a hostage is following them. With the other two, you can make a campwaypoint team-specific.
Using "waypoint save" will save the waypoint data to the waypoint file. Before saving, if you didn't add the 'nocheck' argument, the Waypoints and Paths will be checked for major mistakes and if something is wrong you'll be told so and nothing will be saved. During the checking time CS freezes and depending on the speed of your computer it could easily last for a minute. Don't worry your computer hasn't crashed ! Waypoint files will have the same name as the current map with an extension of ".pwf". The file will be saved into the "cstrike/PODBot" Folder. Your current player name will be saved as the waypoint file creator.
Using "waypoint load" will clear out all waypoints in the current map and load them from the waypoint file in the maps folder. This is a good way to "undo" a bunch of waypoints that you have created but do not wish to save. There is no way to "undo" a single waypoint. You will have to use the "waypoint delete" command to remove waypoints one-by-one.
The "autowaypoint" command allows you to automatically drop waypoints as you run around in a map. To turn autowaypointing on use "autowaypoint on". As you run around the level waypoints will be dropped every 200 units automatically. No waypoint will be dropped if another waypoint is already within 200 units of your current position. So if you want to place lots of waypoints fairly close together you may have to manually place some of the waypoints using the "waypoint add" command. Autowaypointing keeps track of where the last waypoint was dropped (either manually or from autowaypointing) and will place another waypoint when you are 200 units from the last waypoint. If you don't like where autowaypointing placed a waypoint and want to move it a little bit, you can delete the waypoint using "waypoint delete" (but turn off autowaypointing before, since it will place a new waypoint otherwise).
When using autowaypointing, try to stay in the center of narrow hallways and always place a waypoint on BOTH sides of a door. You may have to place some of these waypoints manually using "waypoint add" since places like intersections of hallways and doorway entrances and exits don't usually fall exactly at the location where autowaypoint would want to place a waypoint.
Don't use autowaypointing for locations like ladders or jumps !
The "pathwaypoint" command allows you to display what the bots would consider to be a valid path from one waypoint to other waypoints. Turn pathwaypoint on using "pathwaypoint on" and whenever you get close to a waypoint yellow or white lines will be drawn to all of the other waypoints that the bot would consider to be "reachable". If the connection is a two-way connection the line is yellow, one-way connections appear white. These "reachable" waypoints would be waypoints that are clearly visible from the current location. Certain waypoints will be disallowed as reachable for one reason or another. For example, waypoints suspended in mid-air above the bot would not be considered reachable since the bot couldn't jump high enough to get to them. Also waypoints that are too far away from the current location would not be considered reachable. You may have waypoints that are close enough to each other, but across a wide gap that would be too wide to jump. If the far waypoint is close enough and clearly visible, it would still show as "reachable" since I currently don't have a method to determine if the bot can get to that waypoint or not. The bots will ONLY move from one waypoint to another if there is a path between them. Get in the habit of turning on the pathwaypoint setting when creating waypoint files so that you can see the waypoint paths and will know whether or not a path exists between two waypoints. Also get in the habit of checking that paths exist BOTH WAYS between waypoints. Just because a path is drawn from point A to point B, doesn't mean that a path exists from point B to point A.
The "pathwaypoint add <waypointnr>" command allows you to manually assign a path between 2 waypoints. This is needed in some cases where the waypoints are blocked (by doorways or other objects) and you wish to create a path between these waypoints. Also ladder waypoints need to be manually connected most of the time. Move close to the waypoint you wish the path to start from and use the "pathwaypoint add x" command. Of course the "x" must be replaced by a valid waypoint number. The actual Waypoint Number you're standing on, will be shown in the upper corner of your HUD ( if you turned pathwaypoint on ). For example to manually assign a path between Waypoint Nr. 250 and 251, you first should stand in the near of Waypoint Nr. 250. Then type in: "pathwaypoint add 251" and it will get connected. You should now see a white waypoint path line being draw from the start waypoint to the end waypoint. Note that this is a ONE-WAY connection. If you wish to create a path back in the other direction you will have to start with the second waypoint and end the path back at the first waypoint.
|
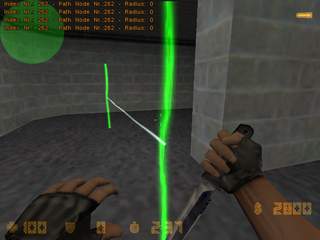
A 1-Way Connection
|
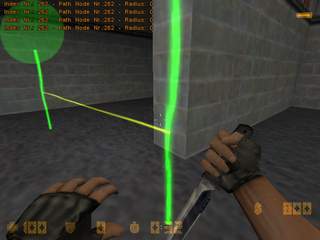
A 2-Way Connection
|
The "pathwaypoint delete x" command is just like the "add" command except that it removes a path (connection) from the starting point to the ending point. This is necessary in some cases where you may have a door that opens from one side and allows you to go through but once the door closes you can't go back through the other way.
When adding waypoints use the pathwaypoint feature to verify that waypoints are actually reachable. Sometimes you add a waypoint and it appears close enough and it also appears to be in plain sight, but the Half-Life engine doesn't indicate that the waypoint is "reachable". Be sure to check this in BOTH directions when defining a waypoint path. Usually you don't have to be too careful about waypoint placement, but in some situations, you may have to spend more time carefully laying out waypoints to get them to be "reachable" (ladders are a good example).
To set crouch waypoints, simply crouch when adding the waypoint. You will notice that the waypoint line is shorter than a normal waypoint. Bot will crouch automatically when approaching a crouch waypoint (if it's not a camping waypoint).
Try placing waypoints at intersections in hallways (do use some "important" waypoints at crossings). Try not to place waypoints in places where the bots would bump into corners of walls or other obstacles when trying to get from one waypoint to the next. Remember the bots won't always take what you consider to be the "obvious" choice when choosing the next waypoint. Try to limit the choices that they have to keep them from heading off in the wrong direction. Also remember that the Bots could go backward in a fight and might not find a waypoint. In that special case they wouldn't find a near enough waypoint (they only search in-between 200 Units) and get stuck forever. Since V1.4 it's important to have a lot of waypoints together to allow the Bots a wider choice. Also put some waypoints in corners or behind walls/doors so they can take good cover positions. The Bots will try to take cover at waypoints not seen by the enemy and the one with the smallest wayzone radius in their range.
Back to Main POD-bot Tutorial

|